

Overview
This article explains how to enable the Shopify integration, synchronize your Shopify newsletter subscribers with a list in Klaviyo, and add web tracking to your Shopify store. After the integration, you can optionally synchronize all your existing signup forms with your Klaviyo account.
Although Klaviyo maintains a native integration with Shopify, your Klaviyo account is a separate entity from your Shopify account. Changes made in your Shopify account, such as billing updates or cancellations, do not apply to your Klaviyo account.
Enable the Shopify Integration
There are two ways to get started with Klaviyo's Shopify integration:
- Add the Shopify integration from the Klaviyo getting started wizard (if you are a brand new customer).
- Add the Shopify integration from the Integrations tab in your Klaviyo account.
The following instructions pertain to adding the Shopify integration from the Integrations tab in your Klaviyo account.
Click on the Integrations tab in your Klaviyo account and then click on the Shopify integration. This will take you to the the settings of your Shopify-integration.

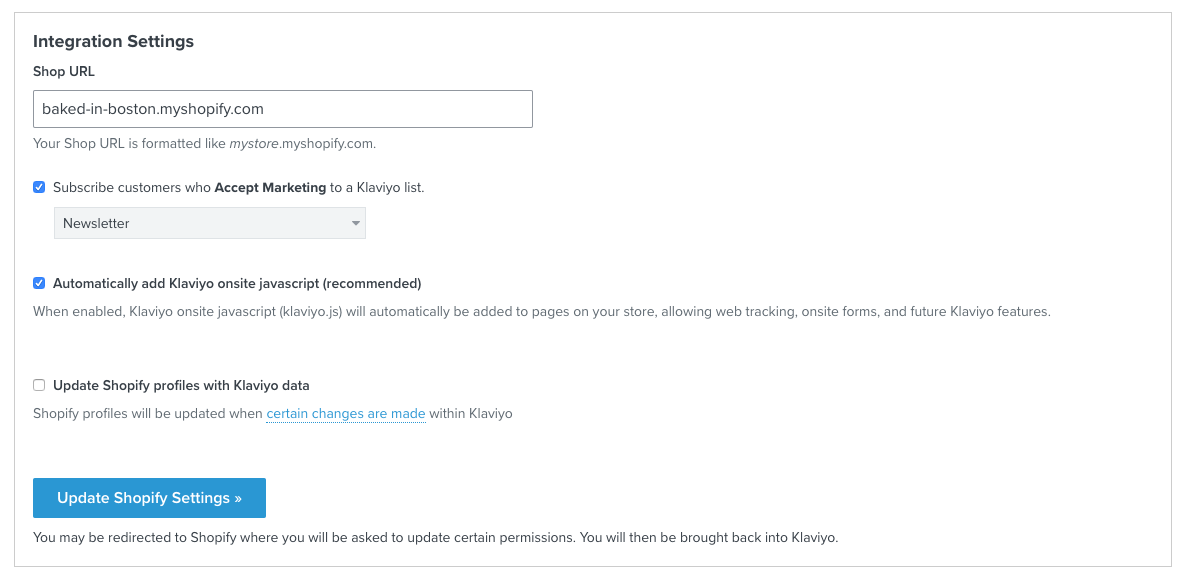
- Paste the URL of your Shopify store and click on Connect to Shopify. There are three additional settings:
1. Add Customers Who Accept Marketing to a Klaviyo List
If you check this box, all customers who accept email marketing at checkout (or who sign up for your default Shopify signup form) will automatically be added to the list you select from the dropdown. Read more below about synchronizing your newsletter subscribers.
2. Automatically Add Klaviyo On-Site JavaScript (Recommended)
By checking this box, Klaviyo's Active on Site tracking snippet will be automatically added. If you do not check this box, you can manually install Klaviyo's JavaScript on your site by following this guide.
3. Update Shopify Profiles with Klaviyo Data
This option will synchronize certain fields such as first name, last name, email marketing consent, and more from Klaviyo to Shopify. Select this option only if you want Klaviyo values to overwrite the corresponding Shopify values. Read more about synchronizing Klaviyo data with Shopify.
Note: For existing profiles in Klaviyo, Klaviyo will start synchronizing those fields to Shopify the next time Shopify syncs data about them to Klaviyo. This is because Klaviyo needs the Shopify ID for existing profiles to update information in Shopify. Profiles that exist in Klaviyo but not in Shopify will not be back-synchronized as a new profile. They still need to perform an action in your Shopify store that adds them to your Shopify account before Klaviyo starts synchronizing data.
2. After configuring your settings, click on Connect to Shopify. This will take you to your Shopify account.
3. Click on Install App. This will begin the synchronization of your Shopify data with Klaviyo and will return you to your Klaviyo account.

4.A green success message indicates that your data is being synchronized with Klaviyo. If you are synchronizing a large amount of data, a green progress bar will show the status of your synchronization. See the section below about monitoring historical data synchronization for more detailed information. Your Shopify integration is now enabled.
Synchronize Your Shopify Newsletter Subscribers with a Klaviyo List
It’s important to automatically add your Shopify subscribers to your Klaviyo newsletter list. Shopify customers can accept email marketing at checkout or they can sign up through the default Shopify signup forms.
In addition to the signup options offered by Shopify, your customers can subscribe via Klaviyo signup forms or through forms created by pop-up or list-growth apps. Check the section below about synchronizing your signup forms with Klaviyo, or learn more about integrating with pop-up or list-growth apps.
New newsletter subscribers are synchronized in real-time through your Shopify integration. If you are using a third-party Shopify theme, the default signup forms of your theme must also apply the Newsletter tag to new subscribers so that Klaviyo can automatically synchronize these subscribers to a Klaviyo list. Contact your theme developer, or if you are comfortable editing your theme's source code, add the following hidden input tag to the input group of your form:
<input type="hidden" name= "contact[tags]" value="newsletter">
We’ll walk you through configuring your Shopify integration settings so that Shopify subscribers are automatically added to a Klaviyo list.
Navigate to your Shopify integration page by checking the box Subscribe customers who Accept Marketing to a Klaviyo list and selecting a list from the dropdown. After selecting the list you want to synchronize with, click on Update Shopify Settings.

When you integrate your Klaviyo account with Shopify, one of the properties synchronized from your store is whether each customer accepts email marketing. This property can be true or false. Below is an example of how the property appears on a customer's profile in your Klaviyo account.

For more information on how the "Email Marketing" property is managed in Shopify, refer to their documentation. This property is always synchronized with your Klaviyo account, regardless of whether you are subscribing customers to a list that accepts email marketing or not.
Shopify synchronizes an Email Marketing property to Klaviyo. It's important to note that the Email Marketing property from Shopify does not indicate whether someone is subscribed to a Klaviyo newsletter list. This means there are situations where someone may have their Email Marketing set to false, yet still be subscribed to your newsletter:
- If a customer checks out and chooses not to accept email marketing at that moment but later subscribes via a signup form, they will still be added to your newsletter list.
- If a customer checks out and accepts email marketing, they will be added to your newsletter list. If they check out again, they may choose not to subscribe again because they are already subscribed. Depending on how your checkout process is configured, Shopify may view this as not accepting marketing (Email Marketing = false). You probably don’t want to treat this customer as an unsubscribed individual and would prefer to keep them on your newsletter list.
Klaviyo will not automatically synchronize historical subscribers to a list when you check the box for "Subscribe customers who Accept Marketing to a Klaviyo list." If you need to add historical subscribers to your newsletter list, you must do this manually. Be sure to read this article on importing subscribers to an existing list.
Adding Web Tracking to Your Shopify Store
Klaviyo provides two web tracking snippets to help you gather valuable information about your customers:
Active on Site
This snippet tracks when your customers visit your site. This snippet is installed with Klaviyo's on-site JavaScript. We recommend installing this snippet by checking the box on the Shopify Integration settings page in your Klaviyo account. If you prefer to install this snippet manually, follow the instructions in the guide to manually install klaviyo.js.
Viewed Product
This snippet tracks when your customers view specific products. Instructions for manually installing this snippet are described below.
The Viewed Product snippet is:
To add Klaviyo's tracking snippets to your Shopify theme, follow these steps:
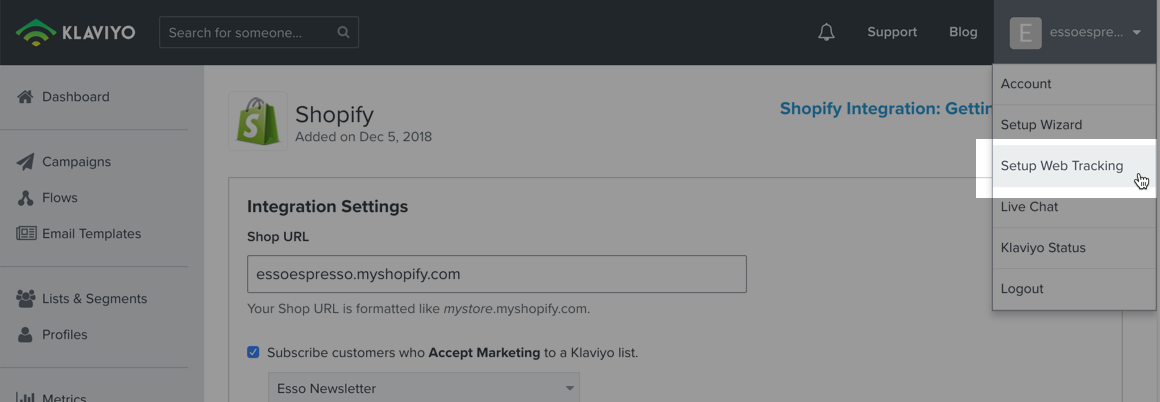
- In your Klaviyo account, click on the Account dropdown and select Set Up Web Tracking. This will take you to a page with Klaviyo's web tracking snippets.
2 . Cppy the code snippet from Step 2.
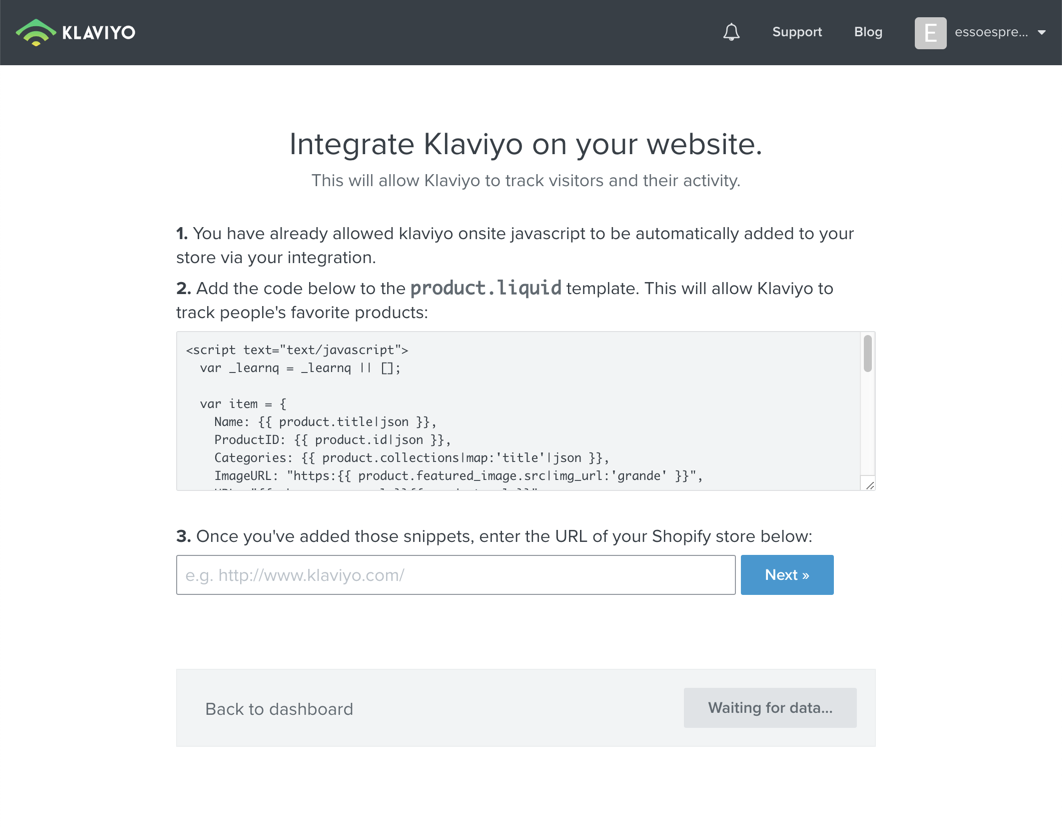
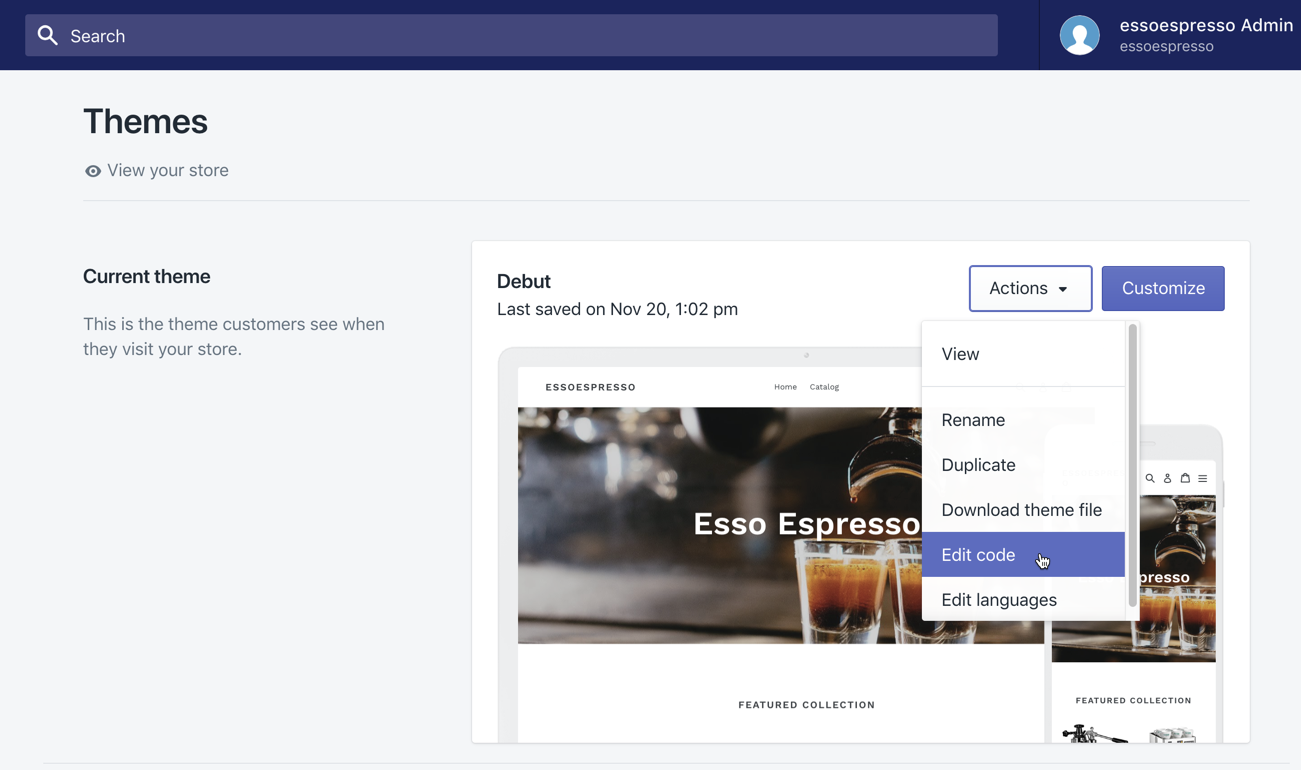
3. In your Shopify Admin, go to Online Store > Themes. Click on the dropdown and select Edit Code.
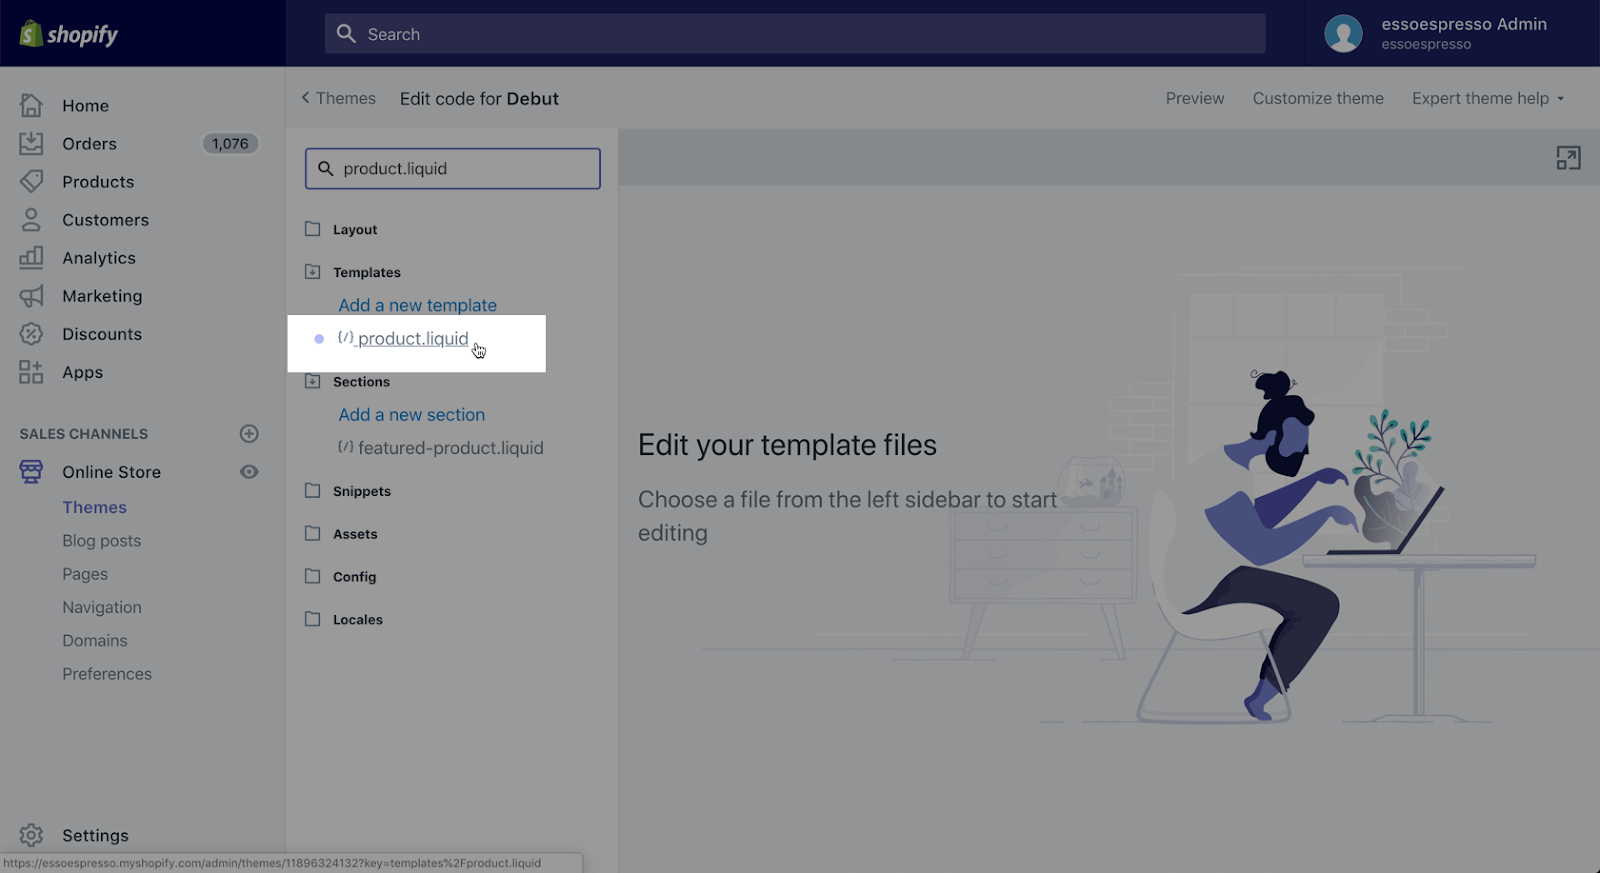
4. Locate the product.liquid file. Click on the file to open it in the editor.
5. Paste the second code snippet at the bottom of the file, after all existing code. Click on Save.
To ensure this snippet works correctly, it must be added to all your product pages. If you are using custom product pages, you may need to add this snippet to another theme file or to your individual custom product pages.

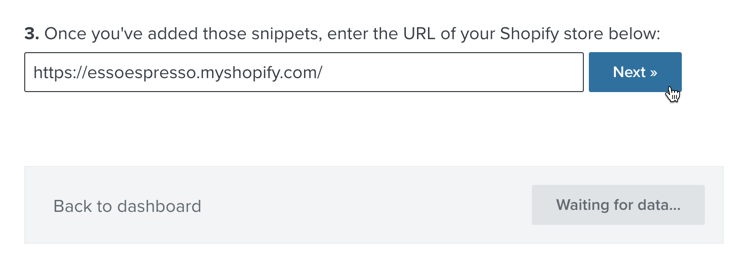
6. Switch back to your Klaviyo account. Enter the URL for your Shopify store in the provided field. Click Next.
7. Click on the generated link where you previously entered your URL. This will trigger an Active on Site event in your Klaviyo account.
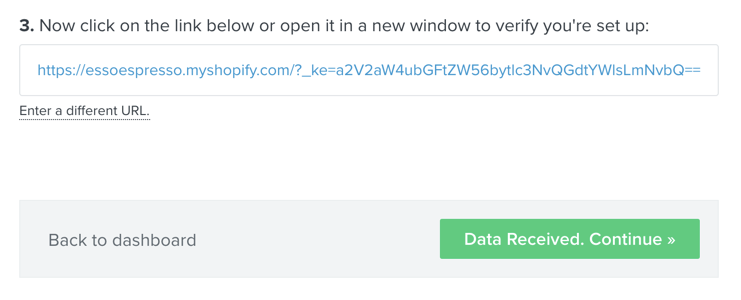
A green Data Received button confirms that your web tracking is set up correctly.
Synchronize Your Shopify Signup Forms or Add Klaviyo Forms
Enabling the Shopify integration offers three options for synchronizing your signup forms with Klaviyo:
- Synchronize your default Shopify signup forms to a Klaviyo list.
- Add a Klaviyo form to your Shopify store.
- Integrate a third-party signup form provider with your Klaviyo account.
If you checked the box Automatically add Klaviyo on-site JavaScript (recommended) on your Shopify Integration settings page, then you have already installed klaviyo.js and your Klaviyo form is enabled. You can go directly to the signup form editor and start creating a form.
If you did not check the box Automatically add Klaviyo on-site JavaScript (recommended), you will need to manually install klaviyo.js by following the guide for installing Klaviyo signup forms.
Monitoring Historical Data Synchronization
When you first integrate with Shopify, Klaviyo synchronizes the last 90 days of your Shopify data so you can immediately start engaging your most recent customers. After synchronizing your most recent 90 days of data, Klaviyo begins your full historical data synchronization. Depending on the number of orders, customers, and products in your store, it may take a few minutes to several days to synchronize all your data.
Once this historical synchronization is complete, new data will be synchronized with Klaviyo in real-time. To check the progress of the initial synchronization, click on the Metrics tab in the sidebar. Look for the Placed Order metric and change the date range of the chart to see which (calendar) dates have been fully synchronized. When synchronization is complete, the Shopify integration will be marked as completed on the Integrations tab. If you want to verify that all data from Shopify has been synchronized, you can check the total orders for a few days or a week. Before you start validating, ensure that your account's timezone matches the settings in Shopify.
To check or update your account's timezone, go to the Account Settings page and review the Contact Information > Organization section. Klaviyo limits the number of unique metrics you can create to 200. When you approach this threshold, you will be warned via an alert in your account, along with an email to the account owner.
Troubleshooting
Here are some quick troubleshooting tips for common issues.
My Shopify Integration Is Not Syncing
If you think your Shopify integration is not synchronizing data correctly, you can update the synchronization by following these steps:
- Click on the Integrations tab in your Klaviyo account.
- Find your Shopify integration and click on View Settings.
- Click the blue button Update Shopify Settings. If you are not logged into your Shopify store, you will be redirected to Shopify and asked to log in.
When you click to update your integration settings, we re-verify with Shopify, and you will be taken back to Klaviyo. If you click to update and then click the Previous button or navigate elsewhere before this authentication process is completed, the integration will be disabled.
A green Settings Updated message at the top of the page confirms that your integration has been updated and is re-syncing. It may take up to 1 minute for this to appear.


Blog posts van Polaris Growth
Andere artikelen


Polaris Growth is a CLV e-commerce agency. We support ambitious online stores with: Klaviyo CRM, conversion optimization, data & analytics and ecommerce strategy.