


You will learn how to integrate Klaviyo with Magento 1 CE and 1 EE. We currently support Magento version 1.5 and higher.
There are two key steps to integrate Magento 1 with Klaviyo:
- Enabling the Magento integration in Klaviyo.
- Installing the Klaviyo extension in Magento.
This guide covers both steps and the associated tasks for Magento 1 stores.
If you plan to integrate a Magento server with multiple stores, please review this guide on supporting multiple stores.
Set Magento API Credentials
Integrating Magento 1.x with Klaviyo requires creating a new role with full access to resources and assigning a new user to this role. The username and password for this user will be used as the API credentials.
It’s also a good idea to ensure that the PHP memory limit on your server and Magento instance is at least 1-2 GB before you begin the Magento 1.x SOAP integration. We start the integration by syncing your historical data, so it's important to verify this setting in Magento and on your server before activating the integration. The default PHP memory limit setting for Magento is usually less than 756 MB, so if you haven’t adjusted this setting before, it’s a good idea to check!
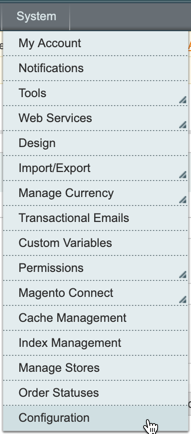
In the Magento admin panel, click on the System tab and select Web Services > SOAP/XML-RPC-Roles.
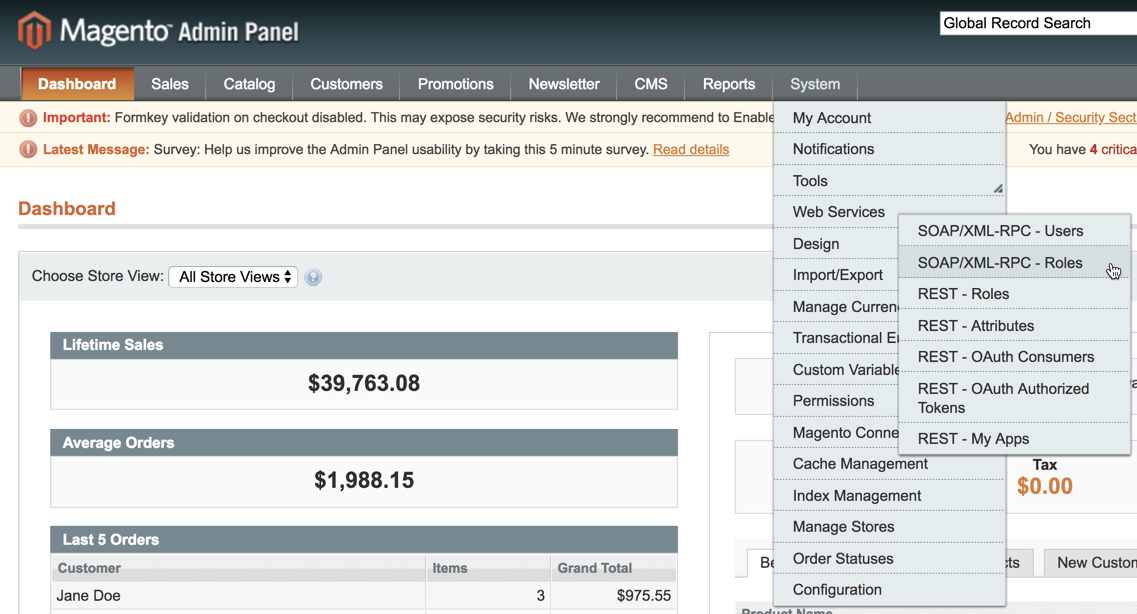
Select Add New Role. Then click on the Role Resources tab and set the Resource Access to All.

Select the Role Info tab, name the role "Klaviyo", and click Save Role.
The role "Klaviyo," as described above, has full access to resources. If you're concerned about permissions and prefer to create a role with limited resource access, refer to the section below on creating a Magento API key with limited permissions.
Click on the System tab and select Web Services > SOAP/XML-RPC-Users.
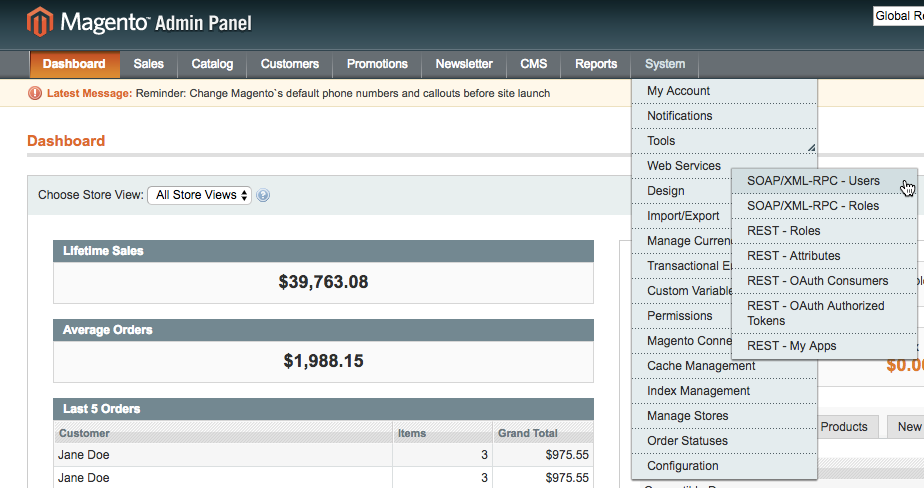
Select Add New User.

Go to the User Role tab and set the role to Klaviyo.
4o

Go to the User Info tab. Set the User Name to "klaviyo" and enter a strong API key. You can use any alphanumeric value. Save the User Name and API key, as you will need them when enabling the Magento 1 integration in Klaviyo. Fill in the rest of the information and click Save User.
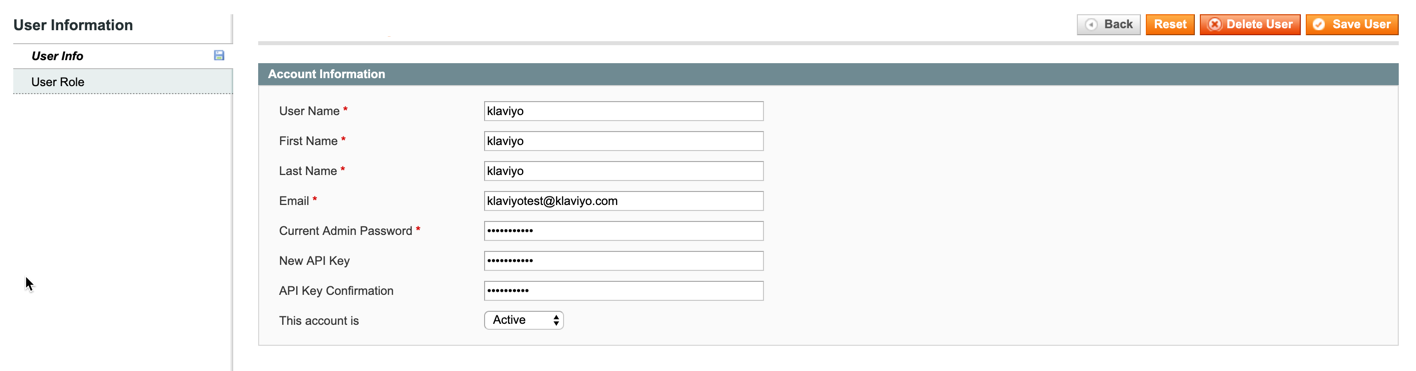
When enabling the Magento 1 integration in Klaviyo, the User Name will serve as the API Username, and the API key will serve as the Password.
API Performance
To improve the performance of your integration, we highly recommend enabling caching for the two Magento Web Services Configuration settings.
In your Magento admin panel, click on System > Cache Management.
Enable caching for the two Web Services Configuration settings.
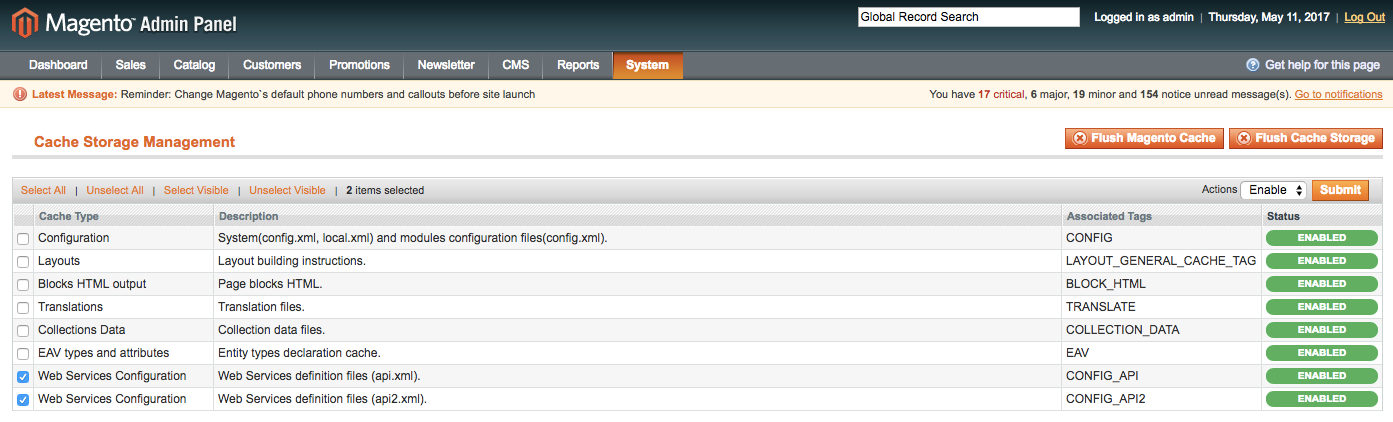
If you make changes to your Magento configuration that could affect the API setup (such as changing your domain name), be sure to clear the caches. This can be done on this page.
Enable the Magento 1 Integration for Klaviyo
Use the Magento API key you created to enable the Magento 1 integration in Klaviyo.
Log in to your Klaviyo account and click on the Integrations tab on the left side of the sidebar. Navigate to the All Integrations tab and search for the Magento integration. Then, click on Add Integration.

Enter the following information:
- Website URL: The website URL is the address of your Magento installation.
- API Username: The username you created for your new user with API permissions.
- Password / API Key: The API key you created for your new user.
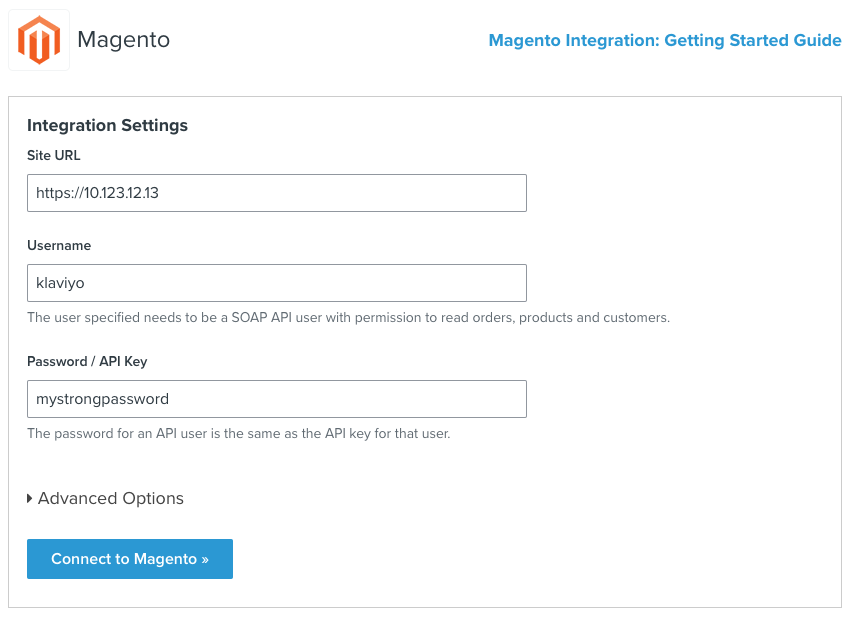
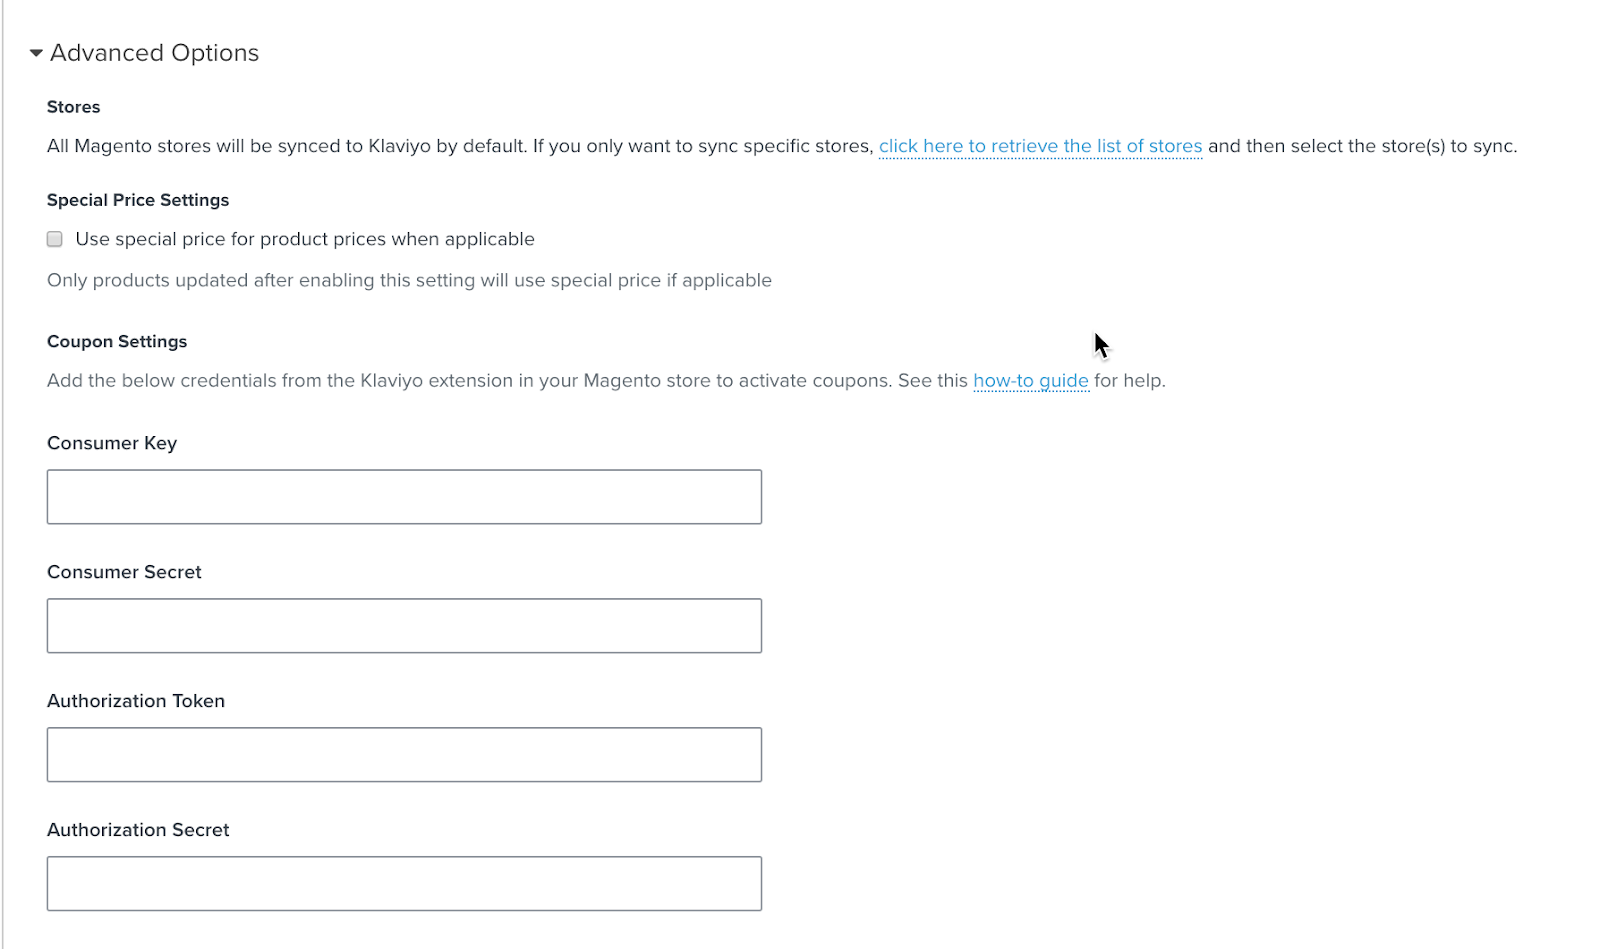
Click on Advanced Options.

Enable these settings if necessary:
- Stores: All Magento 1 stores are synced with Klaviyo by default. This setting allows you to be selective about which stores you integrate. Refer to the guide on supporting multiple Magento stores for more information.
- Special Price Settings: We recommend enabling Special Price Settings if you plan to use this feature. It’s more difficult to enable this feature later. You can read more about this setting in the Special Prices section below.
- Coupon Settings: Review this guide on how to enable coupons in Magento 1 and then fill in these fields accordingly.
Click on Connect to Magento when you're ready.

Magento 1 is now connected to Klaviyo. Next, you will add the Klaviyo extension/plugin to your Magento account.
Install the Klaviyo Extension in Magento
The Klaviyo extension/plugin adds web tracking and tracked product views to your Magento store. Installing the Klaviyo extension for Magento is required to start syncing Checkout Started activities. It’s important to sync your Checkout Started activities so they can trigger the Abandoned Cart flow.
The latest Klaviyo extension for Magento 1 (v.1.7.9, updated in February 2020) is available for download here.
After downloading the extension to your computer, go to System > Magento Connect > Magento Connect Manager.

Under Direct package file upload, click on Choose File and select the extension you downloaded earlier. Click on Upload. The extension will be uploaded and installed.

After installing the extension, go to the extension page to configure the settings.
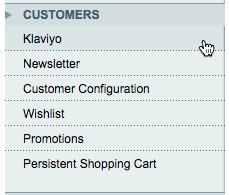
Click on System > Configuration and then click on Klaviyo under the Customers section. If you receive a 404 error after clicking on Klaviyo, log out of Magento and log back in immediately.
Set Enabled to Yes and fill in the other fields. The Consumer Key, Consumer Secret, Authorization Token, and Authorization Secret can be left blank unless you want to set up coupons with Magento.
You can obtain your public and private API keys from your Klaviyo account.

When you're done, click on Save Config.
Sync a Magento Signup Form with a Klaviyo List
You can optionally sync a Magento signup form so that users are added to a Klaviyo list.
First, create a list in Klaviyo that you want to sync with your Magento signup form.
If you're not already on the General Settings tab (as indicated in the previous section), navigate to System > Configuration and click on Klaviyo under the Customers section.
In the General Subscription List dropdown, select the Klaviyo list you want to sync with.

By default, Use Klaviyo Opt-In Settings For This List is set to Yes. This setting applies Klaviyo's opt-in settings for the list. We recommend keeping this setting as is. When enabled:
- For a double opt-in list: The user will receive a confirmation email before they are added to the designated list. Once they confirm via email, they are added to the list and a Subscribe to List metric is created. If no confirmation is received, they are not added to the list.
- For a single opt-in list: The customer is added to the list and a Subscribe to List metric is created.
If No, do not send opt-in emails from Klaviyo is selected, a Subscribe to List metric is never created when a profile is added to a list. We do not recommend this setting, but it is available to maintain legacy settings.
This process will sync all future subscribers. Existing subscribers will need to be migrated manually from your Magento list to Klaviyo.
Set Up a Magento Cron Job
The Klaviyo extension uses cron jobs to stay up-to-date and perform periodic maintenance tasks.
From the Magento admin panel, go to System > Configuration.
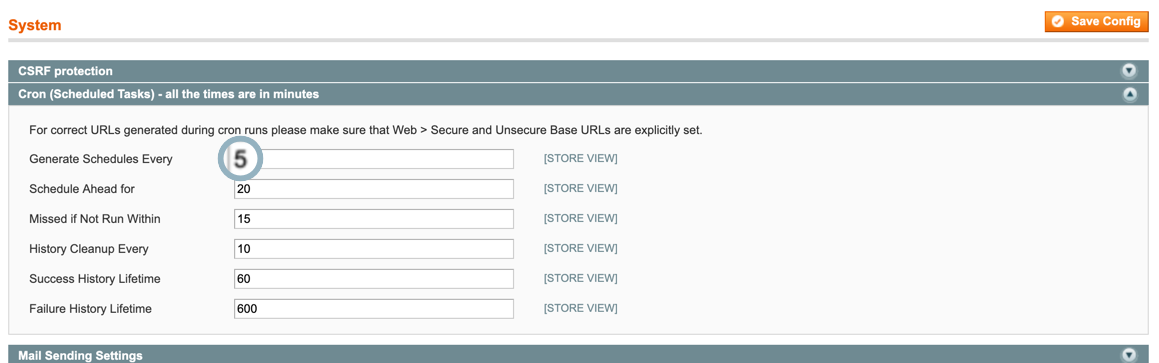
Scroll all the way down to the Advanced section and select System.

Next, select Cron (Scheduled Tasks). Set a cron job to run every 5 minutes, then click Save Config.
For more information on setting up Magento cron jobs, refer to the Magento documentation for detailed instructions on how to configure a cron job.
Setting Up a Cron on a UNIX-Based Operating System
If you have shell access to your server, you can use the crontab service command. The Magento cron should run every five minutes, so the time configuration is:
*/5 * * * *
The full line in crontab looks like this (we recommend the first version):
*/5 * * * * /bin/sh MAGENTO_PATH/cron.sh
*/5 * * * * /bin/bash MAGENTO_PATH/cron.sh
*/5 * * * * /usr/bin/php MAGENTO_PATH/cron.php
*/5 * * * * /usr/local/bin/php -f MAGENTO_PATH/cron.php
Where MAGENTO_PATH is the location of your Magento installation on the server.
Setting Up a Cron via cPanel (or Your Virtual Hosting Provider)
If you don’t have shell access, you can refer to the documentation of your virtual hosting provider. Below is an example using cPanel:
- Log in to cPanel for your hosting account.
- Find the Advanced section and click on the "Cron Jobs" icon.

A list of current cron jobs will be displayed, along with a form to add a new job. Fill in the following settings in the "Add New Cron Job" form. Make sure to replace MAGENTO_PATH with the path to your Magento installation. If you're unsure of the path or how to find it, you can use an FTP program to browse the files on your server and locate the folder where the cron.sh file is located.
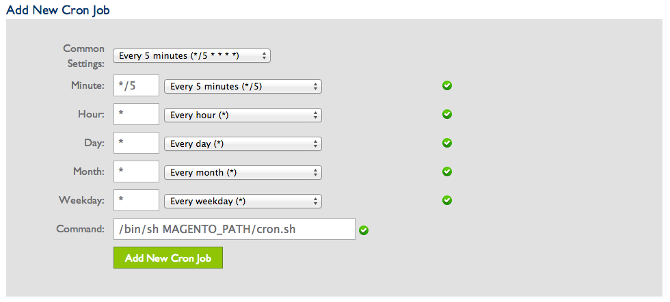
After adding the new cron job, you should see checkout data in Klaviyo within 15 minutes.
Monitoring the Historical Data Synchronization
Upon first integrating with Magento 1, Klaviyo syncs the last 90 days of your Magento 1 data so you can immediately start engaging with your most recent customers. After the sync of your most recent 90 days of data is complete, Klaviyo begins the full historical data synchronization. Depending on the number of orders, customers, and products in your store, it may take anywhere from a few minutes to a few days to fully sync all of your data.
Once the historical sync is complete, new data will be synced to Klaviyo every 30 minutes. To monitor the progress of the initial sync, click on the Analytics tab in the sidebar.
Look for the Placed Order metric and adjust the date range of the graph to see which dates have been fully synced. When the sync is complete, the Magento 1 integration will be marked as completed in the Integrations tab. To manually verify that all data from Magento 1 has been synced, you can check the total number of orders for a few days or a week. Before validating, ensure that your account’s time zone matches the settings in Magento 1.
To check or update your account's time zone, go to the Account Settings page and review the Contact Information > Organization section.
Data Synced with the Magento 1 Integration
The Magento 1 integration syncs with Klaviyo every 30 minutes.
Klaviyo's Magento integration allows you to pull certain customer information from your Magento platform to send personalized, data-driven emails in Klaviyo. Once you've configured your integration, you can personalize and target emails based on customer purchases and website activity. Here are some of the data points that Klaviyo syncs from Magento:
- Customer information, including first name, last name, and location.
- Klaviyo syncs all customers who subscribe to your Magento newsletter from that point forward. It's important to ensure that every customer on your Magento newsletter list has opted in to receive marketing emails.
- Information on fulfilled, refunded, and canceled orders.
- When people visit your website and which items and categories they view.
- These metrics appear in your account as Active on Site and Viewed Products.
- With the Magento integration, you don’t need to add Klaviyo tracking snippets to your website, as these metrics are already handled by the Klaviyo extension.
Refer to Review and Understand your Magento 1 Data for more information.
Metric Limit
Klaviyo limits the number of unique metrics you can create to 200. When you approach this limit, you will receive a warning in your account, along with an email notification to the account owner.
Create an API Key with Limited Permissions
This documentation covers the Magento SOAP API that Klaviyo’s integration is based on. We recommend granting access to all endpoints within the path /api/. Although these may not directly correspond to the permissions you see when setting up the SOAP user and role (as permissions have changed in different 1.x versions), here are the API calls that Klaviyo makes for Magento 1.x:
- catalogCategoryTree
- catalogInventoryStockItemList
- catalogProductAttributeInfo
- catalogProductAttributeMediaList
- catalogProductInfo
- catalogProductList
- catalogProductTagList
- customerCustomerInfo
- customerCustomerList
- customerGroupList
- salesOrderInfo
- salesOrderList
- shoppingCartInfo
- storeList
If you need to allow specific ports (for example, if you have a firewall), the Magento integration currently uses HTTP/80, but this can be switched to 443 if available.
Special Price
When configuring your integration settings, you have the option to fetch the "Special Price," which refers to a sale price for items that can optionally apply within a certain date range. For each product, there are 4 metadata fields we sync:
- price (Required float): The standard price of the item.
- special_price (Optional float): A special sale price for the item. When this price is active, you'll see the special_price displayed alongside a crossed-out price.
- special_from_date (Optional date): The start date when the special_price becomes active.
- special_to_date (Optional date): The end date when the special_price is no longer valid.
On the Magento 1 integration page, there is a checkbox under Advanced Options labeled "Use special price for product prices when applicable." When this setting is enabled, the special price will display in the product block if applicable.
- For dynamic product feeds, the special price is populated at the time of sending.
- For manually selected items from your catalog, the special price is populated once you select the product.

Convert Magento order values to a single currency
Klaviyo supports converting all foreign currencies in Magento to one primary currency in Klaviyo. When this feature is enabled, the conversion takes place when Magento order data syncs with Klaviyo. This is especially useful if you have multiple stores with transactions in different currencies.
Klaviyo checks whether the order_currency_code matches the set global_currency_code. If not, Klaviyo converts the total order amount from the order currency to the global currency specified in your integration settings. This ensures that your financial analyses remain accurate.
Contact Klaviyo's customer service if you would like this feature enabled in your Klaviyo account.
If you have further questions about integrating Magento 1 with Klaviyo after reading this article, reach out to Polaris Growth for more advice.
Find the original article here.

Blog posts van Polaris Growth
Andere artikelen


Polaris Growth is a CLV e-commerce agency. We support ambitious online stores with: Klaviyo CRM, conversion optimization, data & analytics and ecommerce strategy.