

Overview
In Klaviyo, a flow is an automated series triggered by a specific event, containing one or more steps. Flows simplify building and maintaining relationships with your subscribers and customers throughout their lifecycle. You can automate messages that help your business grow without losing the personalization and relevance needed to foster strong customer loyalty.
With flows, you can activate a message or a series of messages based on actions such as someone joining a list, being added to a segment, making a purchase, or abandoning a cart. All data synchronized with your Klaviyo account can be used to trigger and target automated flows. Flows allow you to send timely communication to recipients via email or SMS and easily perform actions like updating a specific field in a profile.
In this article, you'll learn more about flows and how triggered messages can fit into your email marketing strategy.
Flows You Should Set Up First
Four of the most popular flows are also the ones you should set up first. Create a free account if you haven't already.
In order:
- Welcome Series Flow: Introduces subscribers to your brand and converts them into new customers.
- Abandoned Cart Flow: Converts potential customers; this flow is customizable based on items in someone’s cart and whether they are already a customer.
- Post-Purchase Flow: Shows appreciation for customers and informs them about related products they may be interested in.
- Winback Flow: Targets customers who have purchased but do not return to buy again, customizable based on the products they purchased and how many purchases they've made.
Types of Flow Triggers
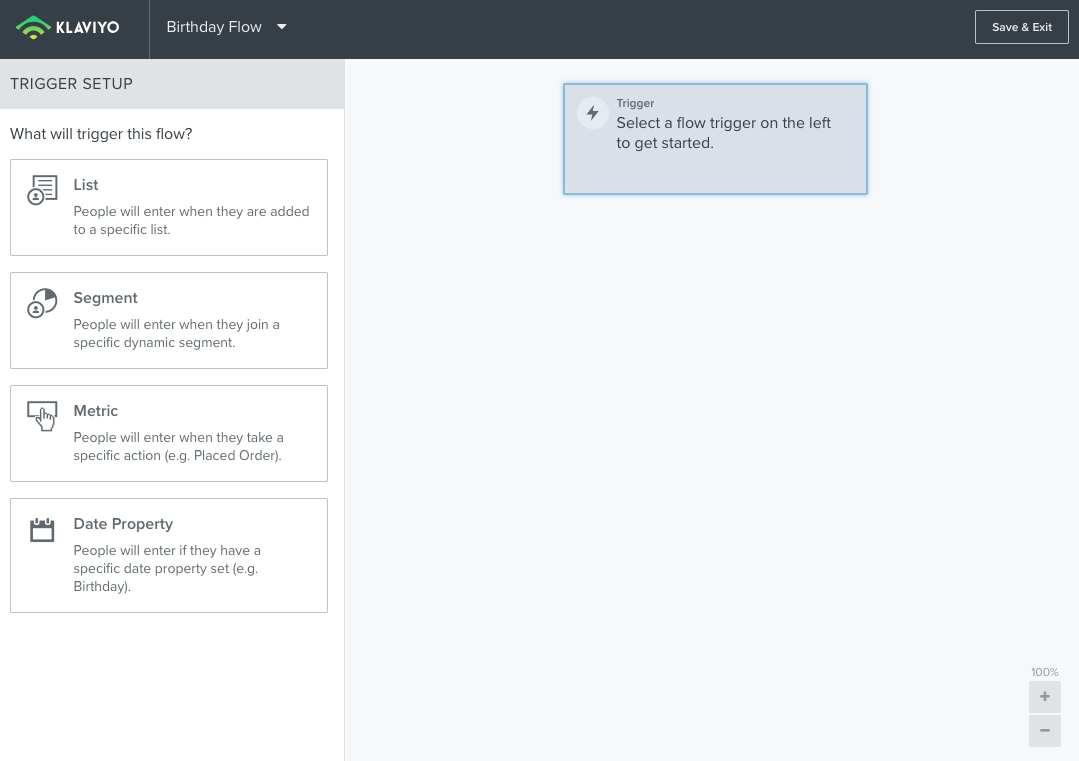
Every flow must have a trigger. The trigger of a flow is what sets the automated series in motion. There are four types of flows:
- List-Triggered: People will qualify for a list-triggered flow when they are added to a specific list. An example is the welcome series.
- Segment-Triggered: People qualify for a segment-triggered flow when they are added to a specific dynamic segment.
- Metric-Triggered: People qualify for a metric-triggered flow when they take a specific action (e.g., making a purchase). To see all possible metrics that can trigger a flow, go to the Metrics tab in your account.
- Date Property-Triggered: People qualify for a date property-triggered flow if they have a specific date-based profile property (e.g., a birthday).
Klaviyo's Built-In Flows
When you integrate an e-commerce or nonprofit platform with Klaviyo, it provides ready-made best practice flows. After configuring your key business data in the Setup Wizard, you can navigate to the Flows tab in your account. Here you’ll see all the best practice flows that are pre-filled. These flows include default templates that provide a suggested layout and sample text. Most of these templates will also be configured to pull in relevant dynamic personalized content through your integration.
If you find a flow you want to add to your account, click on it to view the sample model. Here you will see:
- A live example of what the flow looks like
- A brief description of the flow’s purpose
- How the flow is tagged
- The name of the flow (editable)
- The tag added to the flow (editable)
- The trigger of the flow (editable in some cases)
- All necessary requirements for using the flow.
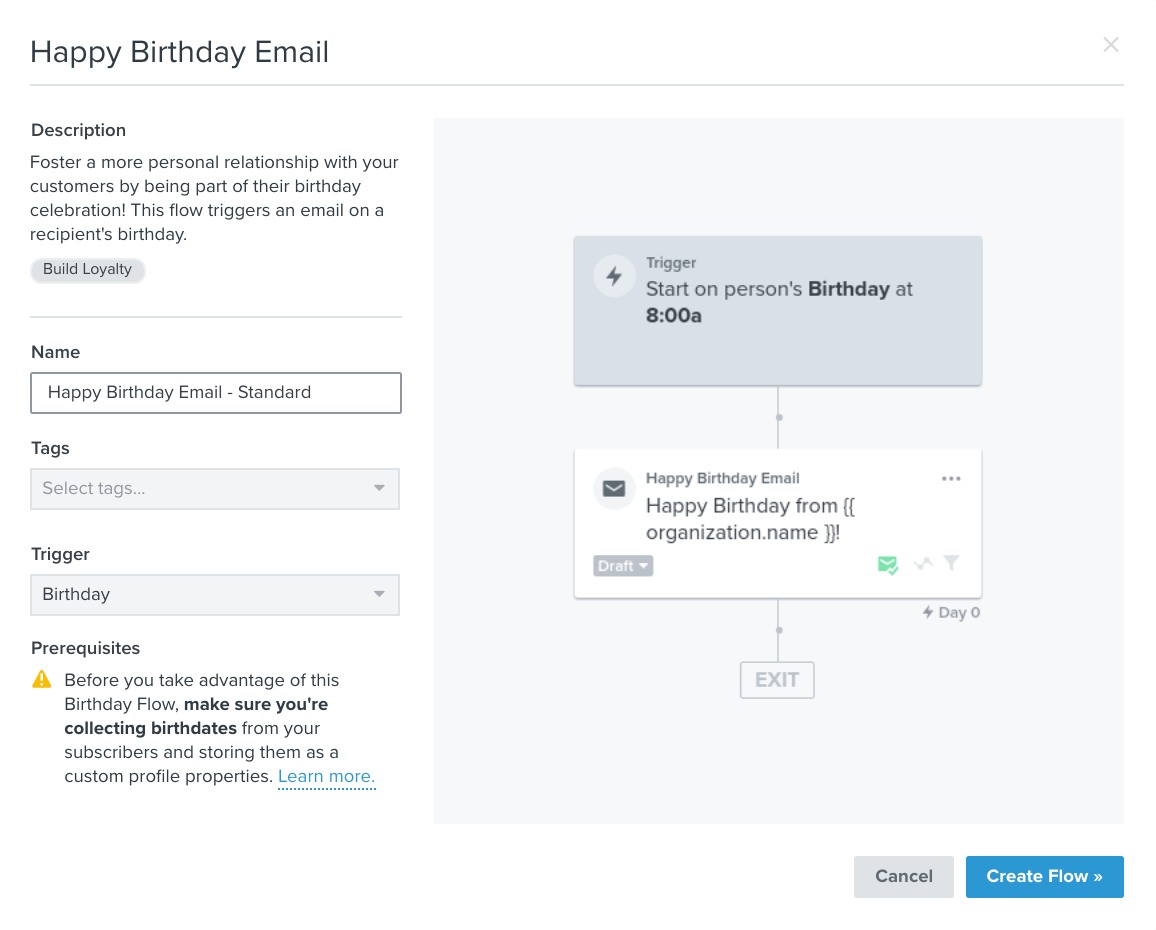
Once you click on Create Flow, you’ll be taken to the visual flow builder where you can edit and customize the flow to your needs. Even if you don’t integrate third-party tools, you will still have a standard welcome series. This flow is triggered when new subscribers are added to a list. When editing this flow, you’ll need to select the list to which you want to add subscribers to activate the welcome series.
We highly recommend reviewing, adjusting, and previewing all standard flow messages before you go live with your flows.
Creating a New Flow
To create a new flow, click on the Flows tab in the main navigation sidebar of your account and then on the Create Flow button. If you’re unsure where to start, browse the Flow Library for innovative automation ideas for the entire customer lifecycle. Alternatively, click on Create from Scratch to build an entirely new flow.
When creating a brand new flow, you first need to name your flow. The name should be easy for you and your team to understand—over time, as you use Klaviyo more frequently, the number of flows can quickly add up.
Next, select a trigger for your new flow—you can choose one of the four options described above: list, segment, metric, or date property.
You will narrow down each trigger. For example, if you choose a list-triggered flow, you will need to select which specific list will set your flow in motion.
Setting Up Your Trigger Filters and Flow Filters
Whenever someone qualifies to enter a flow based on the trigger, Klaviyo will first check all trigger and flow filters. Those who do not meet the trigger and flow filters at that time will be filtered out immediately and will not be scheduled for any component in your series.
Everyone who meets the flow’s trigger and flow filters officially enters the flow and is scheduled for messages and splits based on the delay you have set.
For each step (email, split, etc.), flow filters will be checked again to ensure that recipients still meet the flow criteria. Trigger filters are not re-checked at the time of sending.
When each message is scheduled to be sent, Klaviyo reapplies your flow filters (e.g., has Placed Order zero times since starting this flow) and skips anyone who does not meet these filters at the time of sending. This is why you see people in the waiting queue for flow messages—in the Waiting bucket—you know they should not receive the message based on the flow filters. If someone initially qualifies to receive the message upon entering the flow, they will appear as waiting for messages in your series. However, flow filters are always reapplied right before each message is sent.
You can view the full Recipient Activity for a specific flow message by clicking on View All Activity in the left sidebar of a message. Here you can also see who has been skipped from receiving a message in the Skipped tab. Clicking on this dropdown will show various skipped options. When someone no longer qualifies to receive a flow message at the time of sending, Klaviyo will skip them. Typically, someone is skipped because they do not meet the flow filters or because they have unsubscribed since and are suppressed in your account.

Back-Populating Flow Recipients
If you create a new flow and want to include those in the queue who would have been included had it run earlier, you can use the back-population feature. This feature can be found in the Manage Flow dropdown menu.

For more information on back-populating a flow, refer to the relevant resources.
Adding Steps to a Flow
After you’ve created a new flow, selected a trigger, and added your desired trigger and/or flow filters, you’re ready to add additional components to your flow series.
To add an email to your flow, click on the email component in the sidebar and drag it onto the visual canvas. Each "drop-able" location for an email turns green when you drag it to the canvas, and a light green drop zone appears as you approach a drop point. Once an email is placed on the canvas, it can be configured in the left sidebar. Read more about the Email component.
Scheduling a Step in a Flow
Messages and other components are scheduled based on delays that have been added in a flow series. If components are back-to-back (i.e., without any time delay), they will all arrive simultaneously, which is usually not desirable.
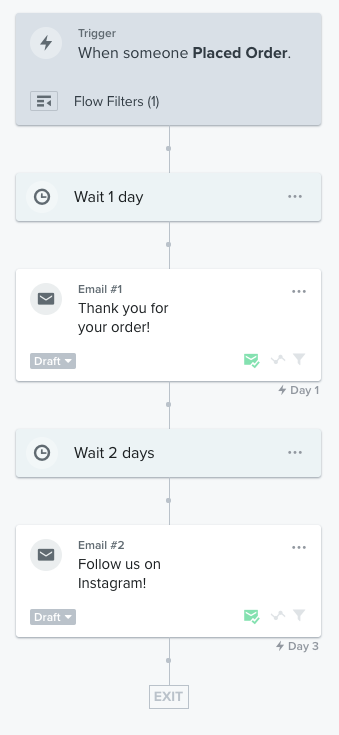
Each delay creates a waiting period between one component and the next. This way, emails in a flow series are scheduled relative to one another. This means that if email #1 in a flow is sent one day after the trigger event and you drag a time delay of two days between the first and second emails, email #2 will be sent three days after the trigger event.
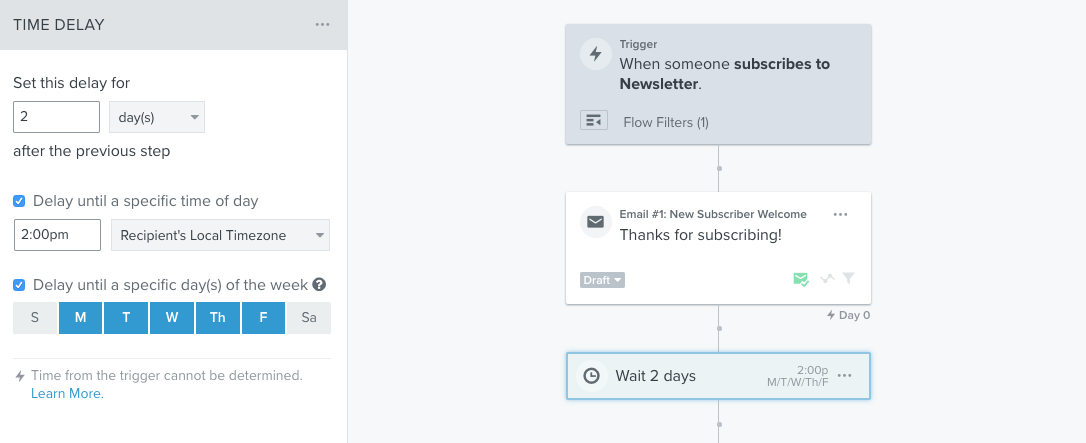
You can set a delay for any number of minutes, hours, or days. To send a message immediately after the previous step, you do not need to drag in a delay.
You can also choose whether to set a delay until a specific time of day or a delay that only applies to certain days of the week.
After setting a delay, you can always adjust it by clicking on the time delay component. Note that updating a delay for a message does not affect messages that have already been scheduled. The updated timing only impacts newly scheduled messages in the future.
The Flow Action Status
There are three possible statuses for a flow action: draft, manual, or live. You can change the status of a message in the left pane or update the status for each action in bulk.
- Draft
This is the default status for a new message and the status you should use while configuring the content and adjusting settings. When a message is in draft, no one will be queued for it or receive it. If you change a message in a live flow to draft, contacts will proceed to the next step and skip the draft message. - Manual
When you’re finished configuring a new message and want to test it, you can place it in manual mode. When a message is in manual mode, it is active in your flow, but these messages are not automatically sent. You must manually review and send all scheduled messages. When a contact is scheduled as "needs review," they will proceed to the next step. If you have later messages in the series that are live, they can still receive them while waiting for approval to receive manual messages. - Live
To "turn on" a message in a flow series, you want to change the status of the message to live. A live message is active in your flow and is automatically sent.
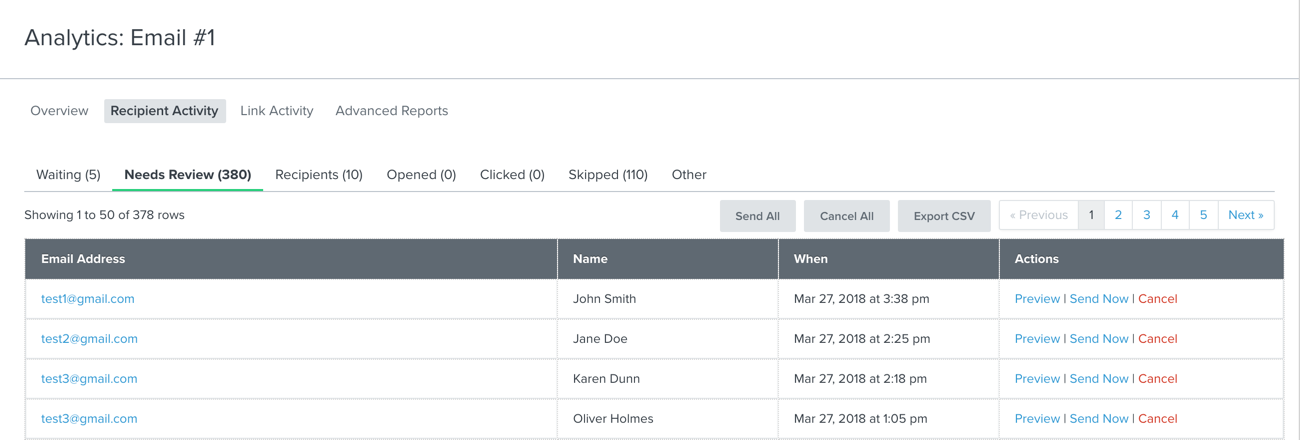
If a flow message is set to manual, you’ll see all ready-to-review-and-send messages in the Needs Review section of the Analytics snapshot in the left sidebar. By clicking on View All Analytics, you’ll be taken to a report where you can view all recipient activity for your flow message.
If you change the status of a message from manual to live, all messages in the Needs Review section will remain there until they are manually reviewed and handled. These messages will not be automatically sent when the status of the message is set to live.
In the Needs Review section within Recipient Activity, you can choose Send All or Cancel All, or click Send Now or Cancel for an individual message.
If there is a delay for your flow message, you’ll also notice that people are queued in the Waiting section within the Recipient Activity of your message. This view shows who has entered your flow and is currently waiting to receive the selected message.
Flow Analytics
To understand how a flow is performing overall, you’ll want to look at the message performance across your entire series. With the Visual Flow Builder, you can display analytics on the visual canvas itself. To do this, click on Show Analytics in the top header menu when you’re in the builder for a specific flow. You’ll then see that all message boxes expand with key performance metrics along with a customizable time frame.
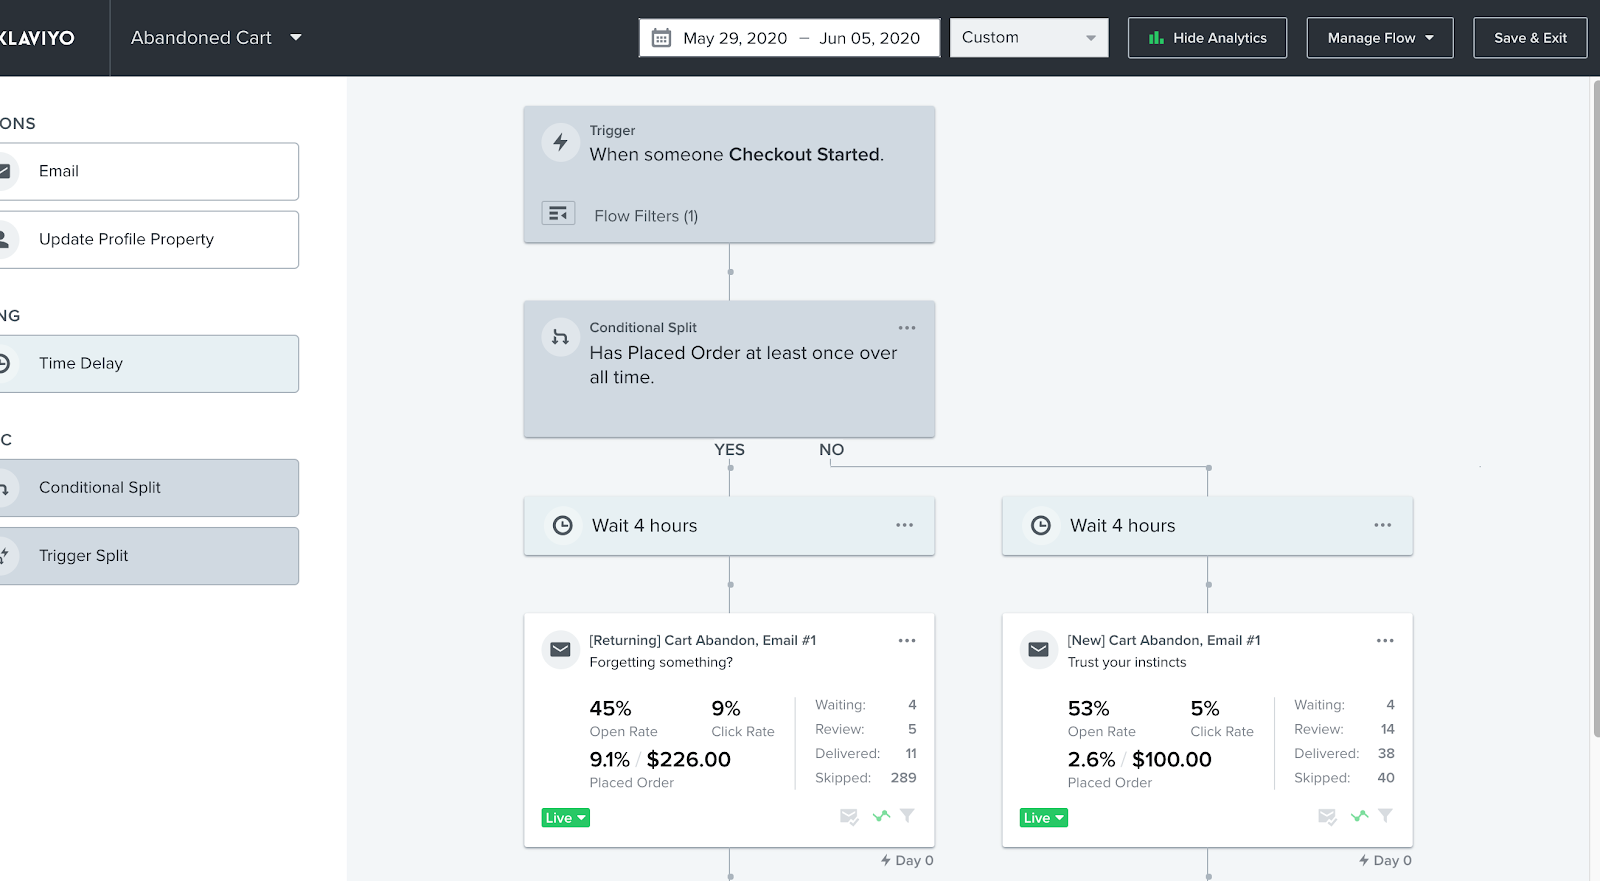
For each action, if selected, you can also view a 30-day snapshot in the sidebar and click to see robust analytics around that action step in your series.
To dive deeper into flow analytics, check out this guide for insights on flow analytics.
Additional Resources
More information about flows:

Blog posts van Polaris Growth
Andere artikelen


Polaris Growth is a CLV e-commerce agency. We support ambitious online stores with: Klaviyo CRM, conversion optimization, data & analytics and ecommerce strategy.